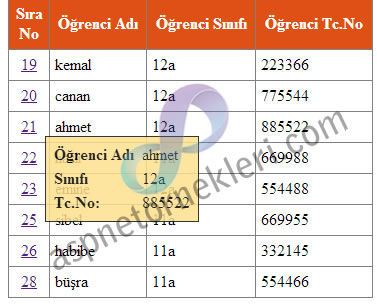
Asp.Net GridView jQuery İle Satır(Kayıt) Ayrıntılarını Gösterme
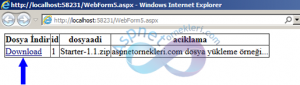
Asp.net GridView kontrolü ile görüntülenen kayıtların ayrıntılarını veya o kayıtla alakalı bir açıklamayı fare üzerine geldiğinde görüntülemek için bir uygulama yapacağız. GridView uygulamamızda kullanacağımız jQuery dosyasını ilk olarak buradan indiriyoruz ve projemizi kaydettiğimiz klasöre kopyalıyoruz
Kaynak kodlarımız… tasarım için
<%@ Page Language="C#" AutoEventWireup="true" CodeBehind="WebForm2.aspx.cs" Inherits="sqlserverornek.WebForm2" %>
<!DOCTYPE html PUBLIC "-//W3C//DTD XHTML 1.0 Transitional//EN" "http://www.w3.org/TR/xhtml1/DTD/xhtml1-transitional.dtd">
<html xmlns="http://www.w3.org/1999/xhtml">
<head>
<title>Gridview satır ayrıntıları www.aspnetornekleri.com</title>
<script src="http://code.jquery.com/jquery-1.8.2.js" type="text/javascript"></script>
<script src="jquery.tooltip.min.js" type="text/javascript"></script>
<script type="text/javascript">
function InitializeToolTip() {
$(".gridViewToolTip").tooltip({
track: true,
delay: 0,
showURL: false,
fade: 100,
bodyHandler: function () {
return $($(this).next().html());
},
showURL: false
});
}
</script>
<script type="text/javascript">
$(function () {
InitializeToolTip();
})
</script>
<style type="text/css">
#tooltip {
position: absolute;
z-index: 3000;
border: 1px solid #111;
background-color: #FEE18D;
padding: 5px;
opacity: 0.85;
}
#tooltip h3, #tooltip div { margin: 0; }
</style>
</head>
<body>
<form id="form1" runat="server">
<div>
<asp:GridView ID="gvDetails" AutoGenerateColumns="false" CellPadding="5" runat="server">
<Columns>
<asp:TemplateField HeaderText="Sıra No">
<ItemStyle Width="30px" HorizontalAlign="Center" />
<ItemTemplate>
<a href="#" class="gridViewToolTip"><%# Eval("id")%></a>
<div id="tooltip" style="display: none;">
<table>
<tr>
<td style="white-space: nowrap;"><b>Öğrenci Adı</b> </td>
<td><%# Eval("ad")%></td>
</tr>
<tr>
<td style="white-space: nowrap;"><b>Sınıfı</b> </td>
<td><%# Eval("sinif")%></td>
</tr>
<tr>
<td style="white-space: nowrap;"><b>Tc.No:</b> </td>
<td><%# Eval("tcno")%></td>
</tr>
<tr>
<td style="white-space: nowrap;"><b>Adresi</b> </td>
<td><%# Eval("adres")%></td>
</tr>
</table>
</div>
</ItemTemplate>
</asp:TemplateField>
<asp:BoundField HeaderText="Öğrenci Adı" DataField="ad" />
<asp:BoundField HeaderText="Öğrenci Sınıfı" DataField="sinif" />
<asp:BoundField HeaderText="Öğrenci Tc.No" DataField="tcno" />
</Columns>
<HeaderStyle BackColor="#df5015" Font-Bold="true" ForeColor="White" />
</asp:GridView>
</div>
</form>
</body>
</html>
Uygulamada ben kullandığım veritabanına uygun olan alanları seçip ona göre değerler girdim sizde kullandığınız veritabanı ve tabloya uygun alanlara göre kodları düzenleyebilirsiniz.
using System;
using System.Collections.Generic;
using System.Linq;
using System.Web;
using System.Web.UI;
using System.Web.UI.WebControls;
using System.Data;
using System.Data.SqlClient;
namespace sqlserverornek
{
    public partial class WebForm2 : System.Web.UI.Page
    {
        protected void Page_Load(object sender, EventArgs e)
        {
            if (!IsPostBack)
            {
                griddoldur();
            }
        }
        protected void griddoldur()
        {
            string yol = @"Data Source=L1-PCOGRETMEN\SQLEXPRESS;initial Catalog=ogrenci1;integrated security=sspi";
            SqlConnection baglan = new SqlConnection(yol);
            string sorgu = "select * from kayit";
            SqlDataAdapter sadp = new SqlDataAdapter(sorgu, baglan);
            DataSet ds = new DataSet();
            sadp.Fill(ds);
            this.gvDetails.DataSource = ds.Tables[0];
            this.gvDetails.DataBind();
        }
    }
}